Trees
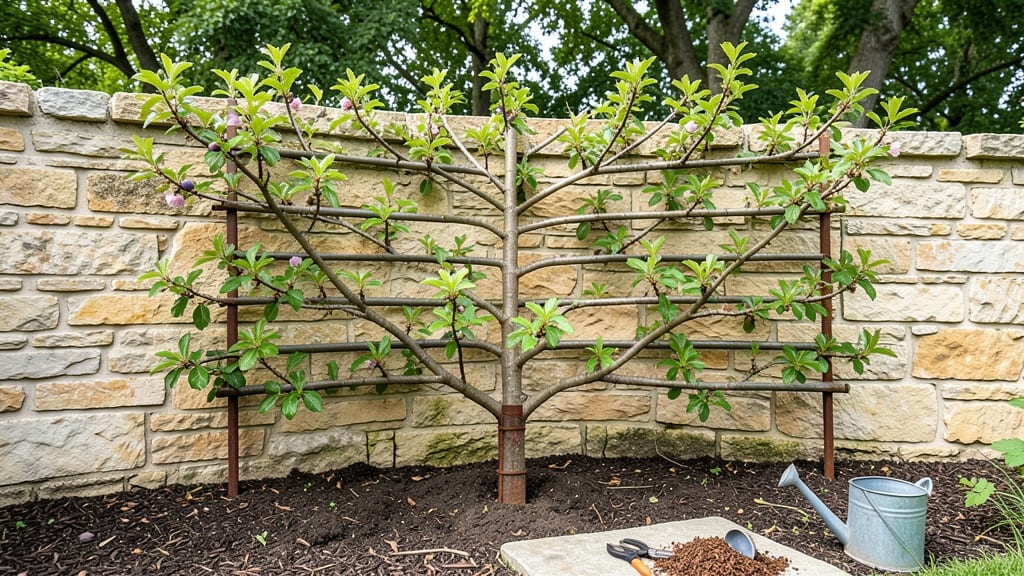
Transforming a tiny patch into a lush plum orchard with plum espalier trees is the kind of gardening magic that makes neighbors do double-takes. 🌿 I remember the first time I saw one—those perfectly sculpted branches heavy with fruit against a blank wall—and knew my backyard could do the same.
The secret lies in training the tree flat against a fence or wall, turning what would be a sprawling mess into a tidy, productive masterpiece that fits even the smallest yards.
You don’t need acres or fancy tools—just a sturdy support, a few basic pruning cuts, and a little patience. My first attempt used a simple wooden trellis against my garage door, and within two years, I had plums I could reach without a ladder.
The best part? Espaliered plums double as living art—curved branches create natural patterns, and the fruit ripens earlier than standard trees. Plus, you’ll save space while growing more fruit than you ever could with traditional planting.
Imagine harvesting sweet, juicy plums in July while your neighbors are still waiting for their overgrown bushes to produce. The trees stay compact, so you avoid the mess of fallen fruit, and the open growth means better airflow—fewer pests and diseases too.
Whether you pair them with climbing roses or let them stand alone as a statement piece, these trees turn blank walls into edible gardens. Let’s get those branches growing flat against the sky.
Works for urban balconies, cottage-style gardens, or modern minimalist spaces—just adjust the support and spacing. The key is starting young, but even mature trees can be trained with care. Your small garden just got a whole lot more ambitious.
📚 In This Guide
- What you need
- Instructions
- Tips and common mistakes
- Wrapping up and next steps
What you need
- ● Plum tree saplings: 1–3 dwarf or semi-dwarf varieties (e.g., Prunus domestica or Prunus salicina), 1–3 years old, grafted for consistency.
- ● Espalier wire or trellis system: 3–5 horizontal wires (16–18 gauge), spaced 12–18" apart vertically.
- ● 1–2 vertical support posts (4x4 wooden posts or metal T-posts, 6–8 ft tall).
- ● Pruning tools: 1 sharp bypass pruners (for clean cuts).
- ● 1 pruning saw (for thicker branches).
- ● Garden twine or stretchy tree ties: 50–100 ft (for securing branches).
- ● Balanced fertilizer: 10-10-10 or 5-10-10 (1 lb per tree).
- ● Mulch: 2–3 inches of organic mulch (wood chips or straw).
- ● Watering can or drip irrigation: (for consistent moisture).
- ● Espalier training clips: Reusable metal clips for guiding branches (5–10 pieces).
- ● Fruit tree spray: Organic copper fungicide or horticultural oil (for pest/disease prevention).
- ● Soil amendments: Compost or mycorrhizal fungi (to boost root health).
- ● Decorative elements: Paint or chalk (to mark pruning zones).
- ● Garden gloves: Heavy-duty (for comfort during pruning).
Step-by-step guide to training plum espalier trees
Transform your small garden into a productive orchard with this simple training method.
🌱 Step 1: Select and Prepare Your Young Plum Tree
Choose a 1-2 year old plum tree with a strong central leader and well-spaced scaffold branches. I always pick dwarf varieties like 'Stanley' or 'Methley'—they handle espalier training beautifully and stay compact. Remove any crossing branches or weak growth with clean bypass pruners, cutting just above a outward-facing bud.
Dig a hole twice as wide as the root ball but only as deep. Position the tree so the graft union (the visible bump near the base) sits 2-3 inches above soil level—this prevents rot and encourages strong growth. Backfill with native soil mixed with compost and water deeply until the soil settles.
☀️ Step 2: Choose Your Espalier Framework and Install Supports
Decide on your design: horizontal (fan shape) or vertical (cordon style). For a 4-tree espalier, I use a 4-foot wide trellis with horizontal wires spaced 12 inches apart. Install the trellis firmly into the ground or attach it to a sturdy wall or fence. Use galvanized wire (1/4-inch diameter) for durability—it won't rust and will last for years.
Space your trees 6-8 feet apart along the trellis. Tie each tree's central leader to the bottom wire using soft cloth strips (never wire directly on bark—it cuts and scars). Adjust the tree's position so the main branches will spread evenly along the wires. This is the moment that matters: get the framework right now, and your espalier will grow true.
✂️ Step 3: Train Branches Along the Trellis in Year One
During the first growing season, focus on establishing your main scaffold branches. Select 3-4 strong lateral branches spaced evenly along the trellis. Gently bend each branch to follow the wire, securing it with cloth ties every 6-8 inches. Never force branches—growth should be natural, or you'll snap them.
Prune any competing vertical growth (called "water sprouts") immediately. These steal energy from your espalier structure. You'll see new shoots forming at the base of your tied branches—these are your future fruiting spurs. In late summer, shorten the current year's growth by one-third to encourage bushier growth next spring.
🌿 Step 4: Refine the Structure and Encourage Fruit Production
By year two, your espalier should have a clear framework. Remove any branches that don't follow the wire pattern—keep only those growing parallel to the trellis. Thin out crowded branches to 6-8 inches apart along the wire. This spacing ensures good air circulation, which prevents fungal diseases like brown rot.
Start shaping your fruiting wood by selecting short lateral branches (spurs) that form along your main scaffold. These spurs will bear your fruit. In late winter, prune back any long, whip-like growth to 3-4 buds—this redirects energy into spur development. You'll see tiny flower buds forming in early spring; these will become your plums.
⏰ Step 5: Maintain and Harvest Your Espalier Over Time
Every year in late winter, prune to maintain your design. Remove any branches that grow away from the trellis and thin out crowded spurs. I always leave 2-3 buds on each spur—this keeps production strong without overloading a single branch. After harvest, apply a balanced fruit tree fertilizer (10-10-10) around the base to replenish nutrients.
Harvest plums when they're fully colored and just beginning to soften. Gently twist the fruit from the stem—don't pull, or you'll damage the spur. With proper care, your espalier will produce fruit for decades. The key is patience: it takes 2-3 years to reach full production, but the space savings and easy access make it worth every minute.
Tips & tricks for perfect plum espalier trees
Here's what nobody tells you about training plum espalier trees—these tricks will save you years of frustration.
Tree Selection Matters: When choosing your 1-2 year old plum tree, inspect the scaffold branches carefully. Look for ones that naturally spread outward rather than growing straight up—these will train more easily along your wires. I've learned the hard way that trees with too many upward-growing branches require constant pruning later. The right tree from the start makes all the difference.
Framework Stability is Key: For your 4-foot wide trellis, don't skimp on support. The horizontal wires spaced 12 inches apart should be anchored with sturdy posts or attached to a solid wall. I've seen trellises sag after just one season when they weren't properly secured. Use the ¼-inch galvanized wire as specified—thinner wire will bend under the weight of growing branches.
Pruning Precision: When you shorten the current year's growth by one-third in late summer, make your cuts just above outward-facing buds. This simple technique ensures new growth will continue along your wire pattern rather than shooting off in random directions. I always count buds to visualize where new branches will form—it's like reading a growth map for your tree.
Bud Counting Pays Off: Leaving exactly 2-3 buds on each spur during late winter pruning might seem precise, but it's the secret to consistent fruit production. Too many buds overcrowd, while too few reduce yield. I mark my pruning spots with a pencil before making cuts—this helps me visualize the final shape and ensures I'm not guessing when I cut.
Pro Tips for Plum Espalier Trees
- Here's what nobody tells you about training plum espalier trees—these tricks will save you years of frustration.
- Tree Selection Matters: When choosing your 1-2 year old plum tree, inspect the scaffold branches carefully. Look for ...
- Framework Stability is Key: For your 4-foot wide trellis, don't skimp on support. The horizontal wires spaced 12 inch...
Frequently asked questions
Got questions about growing plum espalier trees? You’re not alone! Here are answers to the most common concerns—from pruning to pests—to help you get started with confidence.
What’s the best time of year to plant an espaliered plum tree?
Plant your espalier plum tree in early spring or late fall when the soil is workable but not frozen. Avoid extreme heat—young roots need time to establish before summer stress. If planting in containers, spring is ideal to kickstart growth.
How often should I prune an espalier plum tree to keep it shaped?
Prune twice a year: late winter (before buds swell) to remove dead wood and summer (after harvest) to refine shape and encourage fruiting spurs. Use sharp shears and clean cuts—avoid over-pruning, which can stress the tree. Aim for 20–30% of new growth removed annually.
What pests or diseases should I watch for in espalier plum trees?
Common issues include plum curculio (tiny weevils), aphids, and brown rot fungus. Prevent pests with netting (for curculio) and neem oil (for aphids). Prevent disease by spacing trees for airflow and pruning to improve sunlight. Remove fallen fruit promptly to reduce fungal spread.
Can I grow an espalier plum tree in a container, or does it need ground planting?
Yes! Containers work well for espalier plums, especially dwarf varieties like ‘Santa Rosa’ or ‘Methley’. Use a 5-gallon pot minimum (bigger for mature trees) with drainage holes. Repot every 2–3 years and fertilize monthly during growing season. Just ensure the container gets 6+ hours of sun daily.
Are espalier plum trees cold-hardy, or do I need to protect them in winter?
Most plum varieties tolerate USDA Zones 5–8, but espaliered trees may need extra care in colder climates. Mulch heavily (3–4 inches) around the base and wrap the trunk with burlap if temps drop below 10°F. Dwarf varieties are slightly more tender—consider a frost cloth for young trees.
How do I know when my espalier plum tree is ready to harvest?
Plums are ripe when they detach easily from the branch, have a deep, rich color (varies by variety), and yield slightly to gentle pressure. Harvest in late summer to early fall, usually 60–90 days after last frost. Pick in the morning for best flavor—don’t let fruit overripe on the tree!
Still stumped? Drop your question in the comments—we’re happy to help!
Wrapping up and next steps
Transforming your small garden into a productive plum paradise is easier—and more rewarding—than you think! With plum espalier trees, you’ve unlocked the secret to maximizing space without sacrificing beauty or bounty.
Whether you’re a seasoned gardener or just starting, this method proves that big dreams don’t need big yards.
Ready to take the next step? Start by sketching your design, gathering supplies, and planting with confidence. Watch your walls and fences become fruit-bearing works of art—one pruned branch at a time! 🌱✨