
Tools
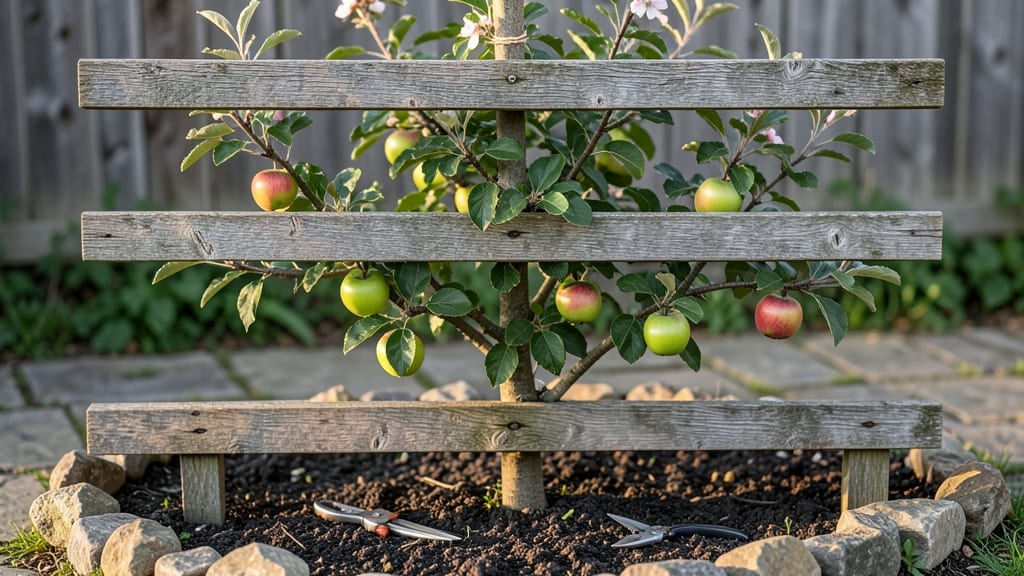
An espalier apple tree trellis turns a tiny backyard into a productive orchard—without sacrificing your patio or lawn. 🌳 I built mine against my fence last spring, and now I harvest crisp apples from branches just arm’s reach away.
The secret isn’t fancy tools or rare varieties, but a sturdy frame and patient training that flattens the tree’s growth into an elegant, fruit-laden wall.
The materials list is simpler than you’d think: galvanized wire, wooden posts, and a few hours of assembly time. You’ll need a young apple tree (dwarf varieties work best) and a sunny spot where the wall gets at least 6 hours of sunlight daily.
The trellis itself is just a grid of horizontal wires—think of it like a ladder for your tree’s branches, guiding them into horizontal layers instead of letting them sprawl.
By summer’s end, you’ll have a tree that looks like modern art while producing 20-30% more fruit than a traditional apple tree. The branches stay accessible for pruning and picking, and the open design lets light reach the ground below.
Plus, the apples ripen earlier because the tree isn’t competing with its own shade.
Works for urban backyards, small patios, or even along a garage wall. The key is starting young—trees trained as espaliers from saplings adapt fastest. Ready to transform that blank wall into a harvestable masterpiece? Let’s get building.
📚 In This Guide
- What you need
- Instructions
- Tips and common mistakes
- Wrapping up and next steps
What you need
- ● Apple tree sapling: Choose a dwarf or semi-dwarf variety (e.g., ‘Columnar,’ ‘Gisela,’ or ‘Malling’ rootstock) for easier training. Quantity: 1 per trellis.
- ● Trellis frame: Wooden posts (4x4 or 6x6 inches, treated for outdoor use) – Quantity: 2-4, depending on trellis size (bury 2 feet deep).
- ● Horizontal crossbars (2x4 lumber) – Quantity: 3-5, spaced 12-18 inches apart vertically.
- ○ Optional: Metal or PVC pipes for a modern look (ensure durability).
- ● Trellis netting or wires: Galvanized wire (12-14 gauge) or plastic-coated espalier netting – Quantity: Enough to stretch between crossbars (e.g., 100+ ft for a 10x10 ft trellis).
- ○ Optional: Twine or soft ties for gentle tree support.
- ● Pruning tools: Bypass pruners (sharp and clean) – Quantity: 1.
- ● Loppers (for thicker branches) – Quantity: 1.
- ● Hand saw (for stubborn branches) – Quantity: 1.
- ● Fasteners: Staple gun + galvanized staples or zip ties – Quantity: 10-20.
- ● Screws/nails (for assembling wooden frames) – Quantity: 10-15.
- ● Soil amendments: Compost or well-rotted manure – Quantity: 2-3 gallons per tree.
- ● Balanced fertilizer (10-10-10) – Quantity: 1 lb per tree.
- ● Sunlight: A spot with 6+ hours of direct sun daily (apple trees are sun-hungry!).
- ● Space: Minimum 6x6 ft for a small trellis (adjust based on tree size).
- ● Water access: Drip irrigation or a hose for consistent moisture.
- ● Patience: Espalier training takes 2-3 years for full structure—think of it as a long-term investment! 🍏💚
Step-by-Step instructions for creating an espalier apple tree trellis
Here's how I train apple trees to grow flat against a fence or wall—perfect for tiny yards.
🪴 Step 1: Choose and Install Your Trellis Structure
Start with a sturdy frame made of 2x4 lumber or metal trellis panels (I use 4-foot sections for standard apple trees). Mount it vertically against a fence, wall, or freestanding post—at least 6 feet tall to accommodate mature growth. The trellis should be 1-2 inches away from the wall to prevent bark damage as the tree grows.
For a horizontal espalier, add 3-4 horizontal branches spaced 12-18 inches apart vertically. For a fan-shaped design, use diagonal branches radiating from the trunk. Secure everything with galvanized screws or staples—just tight enough to hold, but not so tight it restricts growth. I like to pre-drill holes to avoid splitting the wood.
🌱 Step 2: Select and Plant Your Apple Tree
Choose a dwarf or semi-dwarf apple variety (like 'Gala', 'Fuji', or 'Honeycrisp')—they’re perfect for espalier because they stay small. Plant your tree in well-draining soil with full sun exposure (at least 6-8 hours daily). Dig a hole twice as wide as the root ball but only as deep as the container it came in.
Place the tree in the hole, backfill with soil, and water deeply until the soil settles. The graft union (the bump where the scion meets the rootstock) should sit 2-3 inches above soil level—this prevents rot and encourages strong growth. Stake the tree temporarily if needed, but avoid tying it too tightly as the trunk thickens.
✂️ Step 3: Train the Tree’s First Branches
Wait until late winter or early spring (when the tree is still dormant) to begin pruning. Remove any suckers (shoots growing from the base) and water sprouts (vertical shoots). Then, select 3-4 strong, outward-facing branches near the top of the tree—these will become your primary scaffold.
Cut the central leader (main upward stem) back to 12-18 inches above the ground. This forces the tree to focus energy on the horizontal branches. Tie the selected branches to the lowest horizontal trellis wire using soft tree ties (never wire or twine—they can girdle the bark). Bend branches gently to follow the trellis shape, but don’t force them.
🌿 Step 4: Prune and Guide Growth Annually
Every late winter, prune back any branches that grew beyond the trellis. Cut just above a bud facing outward (this encourages new growth in the right direction). Remove any crossing branches or weak, spindly shoots—these compete for energy and reduce fruit production.
As the tree matures, add secondary branches along the primary scaffold, tying them to the trellis as they grow. By year 3, your tree should look like a flat, open canopy with branches fanning out evenly. Thin out some fruit clusters in spring to improve size and quality—leave 6-8 inches between apples on each branch.
☀️ Step 5: Maintain Light and Airflow for Health
Espalier trees need good airflow to prevent disease, so avoid overcrowding branches. If leaves start touching, prune lightly to create space. Water deeply once a week (unless it rains) during the first 2 years, then taper to every 10-14 days once established. Mulch around the base with 2-3 inches of organic mulch to retain moisture.
Fertilize in early spring with a balanced fruit-tree fertilizer (10-10-10 ratio). I use about ½ cup per tree, worked into the top 6 inches of soil. Avoid heavy nitrogen—it promotes leafy growth at the expense of fruit. Harvest apples in late summer to fall, depending on the variety, when they’re fully colored and slightly soft to touch.
Tips & tricks for perfect espalier apple tree trellis
Transforming your apple tree into a space-saving masterpiece takes patience—but these little tricks make all the difference.
Branch Selection Matters: When choosing your primary scaffold branches in Step 3, look for ones that form a 45-degree angle from the trunk. These naturally grow outward and follow the trellis shape better than straight-up branches. I also check for strong, outward-facing buds—these will produce the best framework for fruit production. Avoid branches with weak crotches (where they meet the trunk), as these can split under fruit weight.
Tie with Care: The way you tie branches to the trellis can make or break your design. Use soft tree ties (not wire or twine) and position them just above the branch collar (the swollen area where the branch meets the trunk). Ties should be snug enough to hold but still allow the branch to thicken naturally over time. I check ties every 6 months and replace any that have dug into the bark—this prevents girdling, which can kill the branch.
Pruning for Airflow: In Step 4, when pruning annually, aim to create a lattice-like pattern with branches spaced 8-12 inches apart. This ensures sunlight reaches all parts of the tree and prevents fungal diseases like apple scab. I also remove any dead or diseased branches immediately—don't wait for the annual pruning session. Use sharp, clean pruners and make cuts at a 45-degree angle just above an outward-facing bud to encourage healthy growth.
Harvesting Tips: When harvesting in late summer to fall, look for apples that are fully colored and slightly soft to the touch (as mentioned in Step 5). But here's what nobody tells you—harvest in the morning when temperatures are cooler. This prevents the fruit from overripening quickly and maintains better flavor. Also, use a fruit pick or small pruners to avoid damaging branches, especially with heavier apple varieties.
Pro Tips for Espalier Apple Tree Trellis
- Transforming your apple tree into a space-saving masterpiece takes patience—but these little tricks make all the difference.
- Branch Selection Matters: When choosing your primary scaffold branches in Step 3, look for ones that form a 45-degree angle from the trunk.
- Tie with Care: The way you tie branches to the trellis can make or break your design.
Frequently asked questions
Got questions about espalier apple tree trellises?
You’re not alone! Here are answers to the most common queries to help you grow with confidence—even in tight spaces.
What’s the best time of year to plant an espalier apple tree?
Plant your espalier apple tree in early spring (just as buds swell) or late fall (before the first frost). This gives roots time to establish before extreme temperatures. Avoid planting in summer heat or winter freezes, as stress can stunt growth. For container-grown trees, plant anytime roots aren’t circling the pot!
How often should I prune an espalier apple tree?
Prune twice a year: winter (dormant season) for structural shaping (remove dead wood, thin crowded branches) and summer (after harvest) for light maintenance (trim suckers, water sprouts). Use sharp pruners and sterilize cuts with rubbing alcohol to prevent disease. Pro tip: Aim for an open center to maximize airflow and fruit access!
Can I use a DIY trellis instead of a store-bought one?
DIY trellises work great—just ensure they’re sturdy, weather-resistant, and adjustable. Use materials like PVC pipes, wooden stakes, or metal grids. For espalier, opt for a horizontal or fan shape with crossbars spaced 12–18 inches apart. Secure the tree with soft ties (like tree straps) to avoid bark damage. Budget hack: Repurpose old ladders or fences!
Why aren’t my espalier apples ripening evenly?
Uneven ripening often stems from sunlight gaps or overcrowded branches. Check for:
- Light exposure: Ensure all branches get 6+ hours of sun daily.
- Thinning fruit: Remove excess apples (leave 6–8 inches between fruits) to avoid competition.
- Watering: Drought stress delays ripening—water deeply 1–2x/week (more in heatwaves).
If issues persist, test soil pH (ideal: 6.0–6.5) and adjust with lime or sulfur if needed.
What’s the lifespan of an espalier apple tree, and how do I extend it?
With proper care, espalier apple trees live 15–25+ years! To extend their life:
- Fertilize annually: Use balanced 10-10-10 in spring, then switch to potassium-rich fertilizer (like 0-10-10) in summer.
- Pest/disease watch: Spray neem oil for aphids and copper fungicide for scab. Monitor for fire blight (prune infected branches immediately).
- Rejuvenate old trees: Every 5–7 years, do a hard prune to remove old wood and encourage new growth.
Mulch with wood chips to retain moisture and protect roots in winter!
Wrapping up and next steps
Transforming your small garden with an espalier apple tree trellis isn’t just about saving space—it’s about creating a stunning, functional piece of art that yields delicious fruit! 🍏 With the right materials, patience, and a dash of creativity, you can craft a beautiful, low-maintenance canopy that maximizes your outdoor potential.
Whether you’re a beginner or a seasoned gardener, this project is well within reach.
Ready to take the next step? Start by sketching your trellis design on paper, then gather your supplies and begin building. Before you know it, you’ll be enjoying the fruits of your labor—literally! Happy gardening! 🌱